Come join us where the SISTAHOOD happens!
With over 3,000 members, we are creating, sharing and growing together!
SCRAPS OF COLOR COMMUNITY!
Join now! It's FREE!
See you there.
Remember, the blog is no longer updated but we are sharing our craft love in OUR community.
Come on over.
Tiare.
Tuesday, October 6, 2015
Wednesday, July 29, 2015
It Works!
Hello!
You may recall that I started a 3-ring binder
project – one using only page protectors/photo sheets -- last December. Unfortunately, I got sidetracked and didn’t
finish it. It’s still in its
organization bag ready to go, but life got in the way big time.
Well,
I got another box of photos in the mail from a recent trip to Barcelona
(sidebar: Go there!) and knew I’d
never make it through all those pictures doing traditional 12x12 pages. Besides, I really wanted to use ALL of my photos. I thought back to the 3-ring binder system and
decided I would use this to document the entire trip. I was headed to a weekend scrapbook retreat,
so I was ready for the challenge!
Did
it work? Yes! It was everything I wanted and more. I loved the flexibility of just sliding
photos into the sleeves without too much effort and then, when I felt like I
wanted to do a traditional page, I could do that, too! I see why everyone is getting into this.
These
are a few of those pages. The first one
just shows how easily you can do a full-page layout and slip it right in.
The
next set of photos shows how I placed photos in the page protectors and embellished the strip on the
end on the page.
And,
finally, there are infinite ways to embellish directly on the photo. Here, I just used a velum sticker. I’ve ordered some travel-related stamps and
can’t wait to use those directly on the photos.
This
technique is simple, but so very effective! If you have a specific event or
occasion, I think this would be ideal for that.
Give it a try and let me know what you think. Also, share any good tips you have for using
such a system. I’m hooked!
Happy crafting,
Moanica
Tuesday, July 28, 2015
Saying So Long to the SOC Blog
It is with a heavy heart that I announce that we will be discontinuing the SOC Blog. July will be the last month that we will post to the blog. However, it will remain a place for people to come for information and inspiration. We will leave it as the face for SOC, meaning it will be:
- a place where people can find SOC and connect.
- find inspiration in our previous posts
- learn about and register for upcoming crops, retreats and cruises
- find us on Facebook
- get special announcements.
I want to send out a heartfelt thank to our current and past creative teams. Each of you have put in much time and effort, most often just for the simple joy of sharing. You have been AMAZING. I am forever grateful that you have been on this journey with me.
Unfortunately, I am no longer able to devote the time and effort the SOC Blog deserves. It takes time to grow, recruit and organize. I have tried many times to find someone who could help coordinate the blog, keep things rolling for me, be sure we are getting things posted and help promote and grow the blog, with no success.
Again, thank you from the bottom of my heart. Please be sure to stick around and join us in the Scraps of Color Forum here.
Have an AWESOME day,
Tiare.
Monday, July 27, 2015
Happy Birthday Shaker Card
Hi everyone,
I have fallen in love with my cricket once again and used it to make my first shaker card for this months project. It has helped me to make all the decorations for my little girl's First Birthday party!! I can't believe a year has come and gone already!
So Today I am sharing with you the birthday card that I made from hubs and I to our little girl. I used the Teresa Collins Sophisticated Cricket cartridge and created this number 1 shaped birthday card.
I cut the white number 1 at 5 1/2 inches on the shadow effect and then moved the cricket two spaces horizontally and two spaces vertically in and then cut it again to create a border. I cut the scroll font 1 at 5 1/2 inches in pink to go inside the white border and to create the decorated space for the shaker window.
I cut the transparency and the two base 1's at 5 1/2 inches on the shadow effect, built the shaker well and then filled the shaker well with iridescent white and pink, and clear seed beads. And my little girl's card was done. There is just enough space on the inside of the card for hubs and I to write a little message to her.
I really love how this card came out and I like that it is not the traditional 5 1/2 x 4 1/4 size shaker card. I hope she enjoys it when she gets older.
This also opens the playing field for shaped shaker cards! 😉
Thanks for stopping by. I hope this sparks some inspiration for you when making shaker cards. And there you have it.
Until next time,
Kelli
Saturday, July 25, 2015
Coloring with Pencils.
Hello Crafty Family; Sharette here with you for this month's post.. I have a really quick post to share with you ALL today.. I still have not sat to even try to make any kind of cards or scrap page.. But I have found time here and there to carve out a little coloring. Here are 3 images from Simply Betty Stamps.. I know you have seen a lot of her work.. But I am a creature of habits, and basically if I find something I like; I stick with it. LOL
This one is Powder Puff Betty.. I just love her sassy little pose with her powder and puff and her little sexy bustier. These images are really not for cards. I plan on putting a coloring book or binder with images from all of my favorite stamp and artist company. I often right the colors that I am using so that I can have them as reference.
And last but NOT least. My favorite of the group. " All Polished Up Betty". This little lady is soo me, as I am a LOVER of anything nail polish. I love her hair and cute bows. Yes I did add a little glitter to all of them It would Not BE me if I didn't.
These again are not for cards or tutorial.. Just what I have been doing to try and keep the coloring thing going. I hope you all enjoyed taken a look and as always, if you have any questions or comments. Please leave them below.
Happy Crafting.
Sharette
Thursday, July 23, 2015
Copic Practice Journal
Have you heard the latest research on coloring? It seems that coloring has de-stress
properties for adults. Because of this, many publishers are coming out with
adult only coloring books. Well, we Copic enthusiast have always known of the calming qualities of coloring. But, the coloring book movement has inspired
me to create my own coloring book of sorts.
Using this, I can calm my brain and practice my coloring skills at the
same time and without the stress of producing a stamp worthy of making a card
with. Would you like to give it a try?
It’s super easy!
To start, I went to my favorite research source, Pinterest,
and created a board with nothing but Copic marker practice sheets. If you are
interested in my board, you can find it HERE.
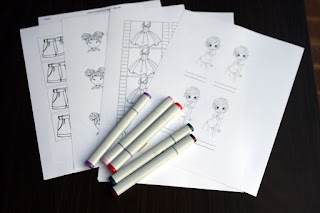
I want to specifically work on hair, faces, eyes and clothing so I
printed a number of sheets designed to practice these elements. I have other sheets saved for practicing many
other things, but I will print those out as I need to.
As I get time, or when I am traveling to teach, I pull out a
practice sheet and color. I have been
diligently working on hair flicking so most of my finished coloring is in this
area. Because I’m not worried about
having to make a finished card, I can focus solely on improving my skill. This is freeing and relaxing.
Since I’m not worried about a finished product, I am also
experimenting with new color combos. I
figured it would be a good idea to capture those practice images in one place
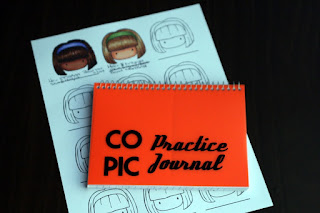
so that I can look back at combos when I color full images. I got a small notebook from my local dollar
type store and vinyled the front (because I vinyl EVERYTHING) to hold my
practice images.
They sit in my little book like this. Eventually, I will place tabs in the book to
divide the sections. However, right now,
I only have completed images for faces and hair. I hope this little project helps you relax
and color. Have a great day!
Tuesday, July 21, 2015
Picture Perfect
Using some mixed-techniques , I used various paints and applied them with my fingers. I added some book pages and home-made stencils. Lastly, I added a picture of my son. I love mixed- media, it is forgiving.
Subscribe to:
Comments (Atom)


