Come join us where the SISTAHOOD happens!
With over 3,000 members, we are creating, sharing and growing together!
SCRAPS OF COLOR COMMUNITY!
Join now! It's FREE!
See you there.
Remember, the blog is no longer updated but we are sharing our craft love in OUR community.
Come on over.
Tiare.

Tuesday, October 6, 2015


Wednesday, July 29, 2015
It Works!

Hello!
You may recall that I started a 3-ring binder
project – one using only page protectors/photo sheets -- last December. Unfortunately, I got sidetracked and didn’t
finish it. It’s still in its
organization bag ready to go, but life got in the way big time.
Well,
I got another box of photos in the mail from a recent trip to Barcelona
(sidebar: Go there!) and knew I’d
never make it through all those pictures doing traditional 12x12 pages. Besides, I really wanted to use ALL of my photos. I thought back to the 3-ring binder system and
decided I would use this to document the entire trip. I was headed to a weekend scrapbook retreat,
so I was ready for the challenge!
Did
it work? Yes! It was everything I wanted and more. I loved the flexibility of just sliding
photos into the sleeves without too much effort and then, when I felt like I
wanted to do a traditional page, I could do that, too! I see why everyone is getting into this.
These
are a few of those pages. The first one
just shows how easily you can do a full-page layout and slip it right in.


The
next set of photos shows how I placed photos in the page protectors and embellished the strip on the
end on the page.


And,
finally, there are infinite ways to embellish directly on the photo. Here, I just used a velum sticker. I’ve ordered some travel-related stamps and
can’t wait to use those directly on the photos.

This
technique is simple, but so very effective! If you have a specific event or
occasion, I think this would be ideal for that.
Give it a try and let me know what you think. Also, share any good tips you have for using
such a system. I’m hooked!
Happy crafting,
Moanica
Tuesday, July 28, 2015
Saying So Long to the SOC Blog
It is with a heavy heart that I announce that we will be discontinuing the SOC Blog. July will be the last month that we will post to the blog. However, it will remain a place for people to come for information and inspiration. We will leave it as the face for SOC, meaning it will be:
- a place where people can find SOC and connect.
- find inspiration in our previous posts
- learn about and register for upcoming crops, retreats and cruises
- find us on Facebook
- get special announcements.
I want to send out a heartfelt thank to our current and past creative teams. Each of you have put in much time and effort, most often just for the simple joy of sharing. You have been AMAZING. I am forever grateful that you have been on this journey with me.
Unfortunately, I am no longer able to devote the time and effort the SOC Blog deserves. It takes time to grow, recruit and organize. I have tried many times to find someone who could help coordinate the blog, keep things rolling for me, be sure we are getting things posted and help promote and grow the blog, with no success.
Again, thank you from the bottom of my heart. Please be sure to stick around and join us in the Scraps of Color Forum here.
Have an AWESOME day,
Tiare.
Monday, July 27, 2015
Happy Birthday Shaker Card
Hi everyone,

I have fallen in love with my cricket once again and used it to make my first shaker card for this months project. It has helped me to make all the decorations for my little girl's First Birthday party!! I can't believe a year has come and gone already!
So Today I am sharing with you the birthday card that I made from hubs and I to our little girl. I used the Teresa Collins Sophisticated Cricket cartridge and created this number 1 shaped birthday card.
I cut the white number 1 at 5 1/2 inches on the shadow effect and then moved the cricket two spaces horizontally and two spaces vertically in and then cut it again to create a border. I cut the scroll font 1 at 5 1/2 inches in pink to go inside the white border and to create the decorated space for the shaker window.
I cut the transparency and the two base 1's at 5 1/2 inches on the shadow effect, built the shaker well and then filled the shaker well with iridescent white and pink, and clear seed beads. And my little girl's card was done. There is just enough space on the inside of the card for hubs and I to write a little message to her.
I really love how this card came out and I like that it is not the traditional 5 1/2 x 4 1/4 size shaker card. I hope she enjoys it when she gets older.
This also opens the playing field for shaped shaker cards! 😉
Thanks for stopping by. I hope this sparks some inspiration for you when making shaker cards. And there you have it.
Until next time,
Kelli
Saturday, July 25, 2015
Coloring with Pencils.
Hello Crafty Family; Sharette here with you for this month's post.. I have a really quick post to share with you ALL today.. I still have not sat to even try to make any kind of cards or scrap page.. But I have found time here and there to carve out a little coloring. Here are 3 images from Simply Betty Stamps.. I know you have seen a lot of her work.. But I am a creature of habits, and basically if I find something I like; I stick with it. LOL


These again are not for cards or tutorial.. Just what I have been doing to try and keep the coloring thing going. I hope you all enjoyed taken a look and as always, if you have any questions or comments. Please leave them below.
Happy Crafting.
Sharette
Thursday, July 23, 2015
Copic Practice Journal

Have you heard the latest research on coloring? It seems that coloring has de-stress
properties for adults. Because of this, many publishers are coming out with
adult only coloring books. Well, we Copic enthusiast have always known of the calming qualities of coloring. But, the coloring book movement has inspired
me to create my own coloring book of sorts.
Using this, I can calm my brain and practice my coloring skills at the
same time and without the stress of producing a stamp worthy of making a card
with. Would you like to give it a try?
It’s super easy!

To start, I went to my favorite research source, Pinterest,
and created a board with nothing but Copic marker practice sheets. If you are
interested in my board, you can find it HERE.
I want to specifically work on hair, faces, eyes and clothing so I
printed a number of sheets designed to practice these elements. I have other sheets saved for practicing many
other things, but I will print those out as I need to.

As I get time, or when I am traveling to teach, I pull out a
practice sheet and color. I have been
diligently working on hair flicking so most of my finished coloring is in this
area. Because I’m not worried about
having to make a finished card, I can focus solely on improving my skill. This is freeing and relaxing.

Since I’m not worried about a finished product, I am also
experimenting with new color combos. I
figured it would be a good idea to capture those practice images in one place
so that I can look back at combos when I color full images. I got a small notebook from my local dollar
type store and vinyled the front (because I vinyl EVERYTHING) to hold my
practice images.

They sit in my little book like this. Eventually, I will place tabs in the book to
divide the sections. However, right now,
I only have completed images for faces and hair. I hope this little project helps you relax
and color. Have a great day!
Tuesday, July 21, 2015
Picture Perfect


Monday, July 13, 2015
Summer Fruit
Summertime and the living is easy... well at least that is the goal. For me, the season is not complete without backyard barbeques, lazy days at the beach, tall glasses of iced tea, and snacking on fresh picked fruit.
Using summer fruit salad as my inspiration, I created a few digital scrapbook pages to share with the SOC family. As always, if you like them please feel free to download (right click & save) them for your personal (non-commercial) projects.
Wishing you all a wonderfully fun, creative, safe and truly awesome summer.


Friday, July 10, 2015
How do you Fuse?
Every where I turn I hear about the "FUSE". I purchased one a few months ago and finally had the chance to play. How do you FUSE? This tool allows you to create custom sleeve sizes, add waterfall sheets and secure memorabilia in a pocket.
I have seen great projects made for Pocket Letters as well as Picture My Life so I thought I take my first swing at using it for a CTMH Picture My Life page I am put together for back to school (It will be here before you know it)....


Here is the almighty "FUSE"....

I gathered my page protectors, beads and CTMH PML cards.

I figured out which PML cards I wanted to use and placed them in the sleeves.
I added a few embellishments i.e.. the button on the wheel, the word cloud and bow.
I decided to fuse one of the pockets after I put a few hearts, a paper clip bow and beads in the sleeve.

I placed a piece of paper under the page protector (to protect my table) and placed the tip of the fuse along the groove of the ruler and pulled it toward me. This tool gets very hot so be careful.

If you look at the top of the pocket you can see where I fused the plastic sleeve together thus not allowing the content to fall out. LOVE IT!!

I played around with a second pocket and cut a PML card diagonally. I placed sequence and beads in the pocket. I made sure there was a separation between the contents and the card and began to fuse.

I again dragged the tool toward me. I found it was easier then pulling it away from me.
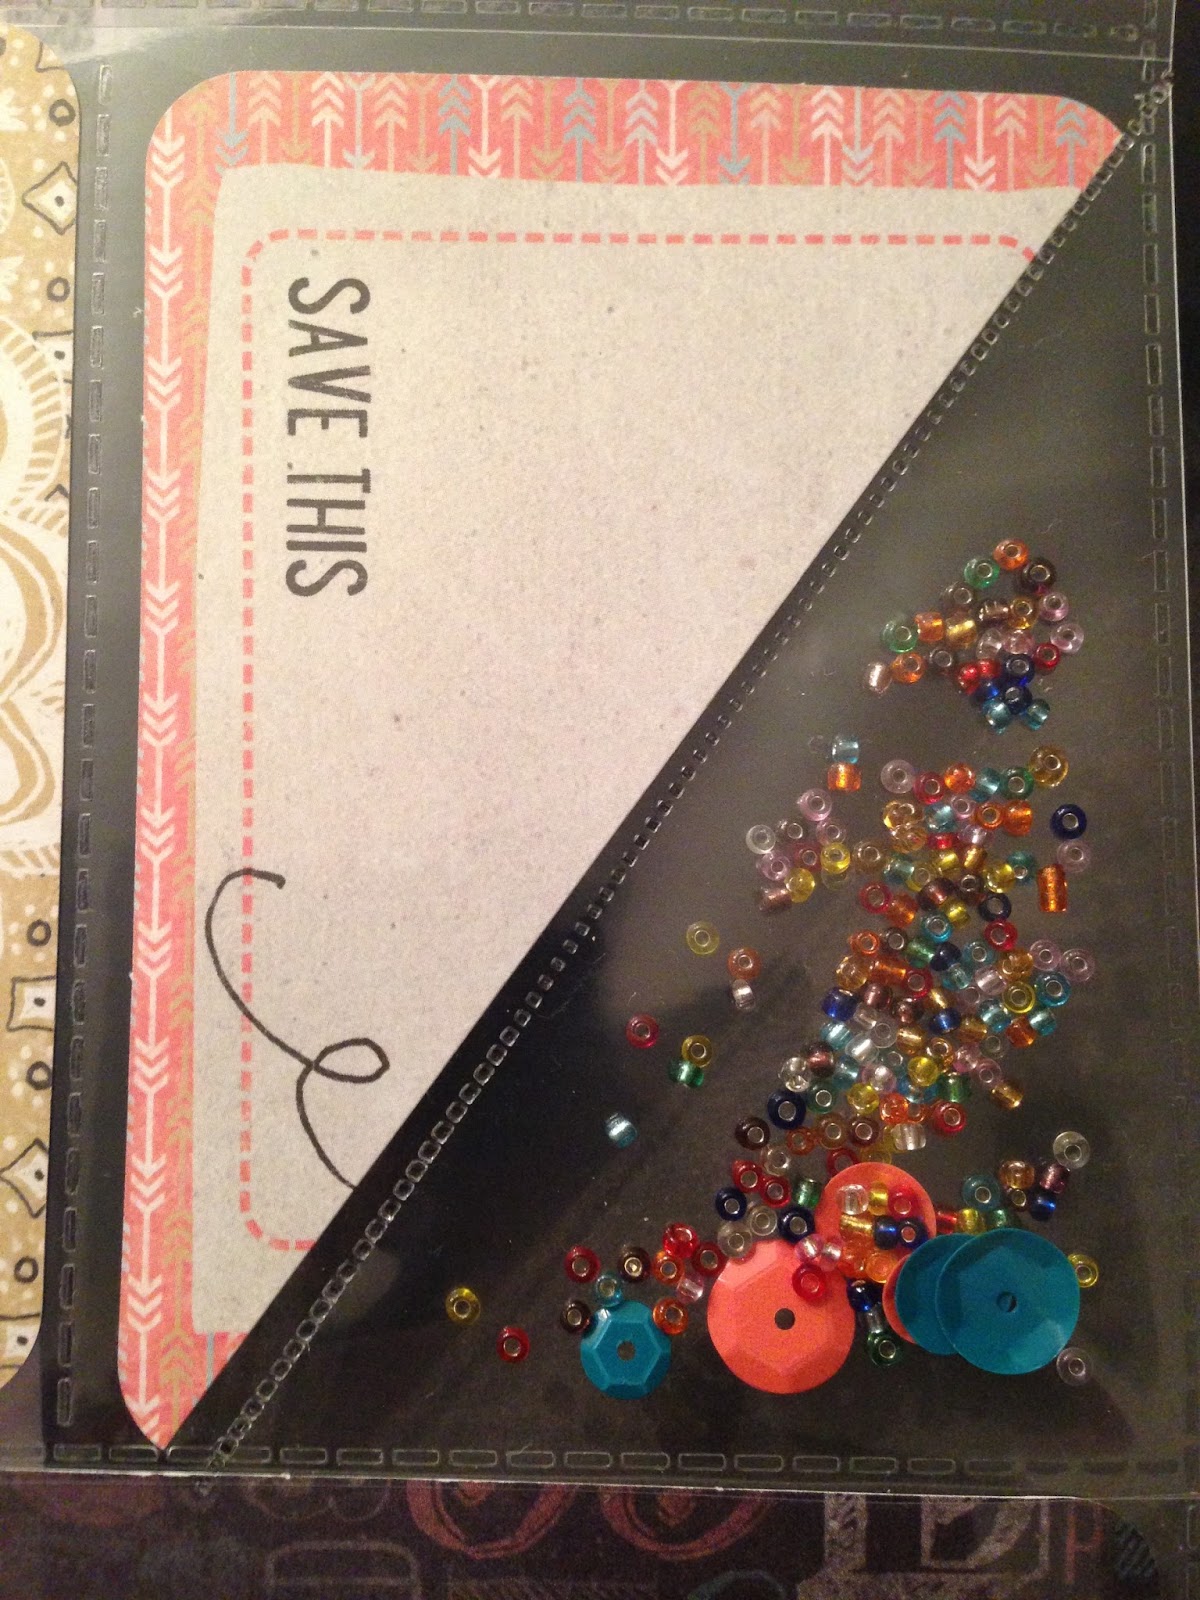
Like magic the fun shaker pieces were separate from the PML card.

This is my finished PML page minus a few pics and journaling I will add when the school year comes. I am sure I will get better with continuous use of this product. I give it 2 thumbs up!!
What have you made with your fuse? Comment below!!
Happy Crafting ~ Shalana
Tuesday, July 7, 2015
Denim, Lace and Pearls
Here’s my
altered project using some old Levi jeans that I don’t wear anymore. I was told to cut them into shorts and wear
them around the house. My creative side lead to my favorite project…a mini album. The theme is Denim, Lace and Pearls. I
must admit it was fun designing, but putting holes through the denim and
chip board with my crop-a-dile was fierce. Thank goodness I still had my eyelet setter. That’s why it’s hard to let go of old tools.

This is how I got started. I LOVE
Sookwang double stick adhesive. It was
included in a goody bag that I received when I attended a crop by Tiare last year. My scrapping sistah
Lakeisa saw me using the last strip and gave me hers. That’s why I love crops. We always share!


Below are
views of the album. (See close up view of the cover) Love this scripture It
is more Blessed to give than to receive.
Acts 20:35. The blue/white lace is over the satin lace and on the wide lace that's attached to the denim. It's a lot of layering, but I love the look!

All of the items used in this mini are from my stash!


Can you imagine the possibilities of using denim on your projects? I'm going to look around and see what else I can alter or use with the left over denim. In the meantime, if you have something you would like to challenge me to use it with let me know. I LOVE a challenge! Thanks for your kind comments and love you show on my projects. Hope you are inspired!!!
Papercrafting Princess
Monday, July 6, 2015
SOC Blogger Challenge: Anything Goes


Happy Monday everyone! I hope you all had a wonderful July 4th weekend full of fun with friends, family, food, and fireworks! Today I am stopping by with a new blogger challenge, and its everyone's favorite:
ANYTHING GOES!!
You know how it goes! Whether you're beating the heat with summertime projects, or everyday creations, be sure to stop by here and post a direct link to your favorite blog post in the comments below, in the blog gallery above, or over in the SOC Blogger Challenge forum. If you haven't had the opportunity to participate in the challenges this year, the challenges are a great way to share your projects with bloggers and other visitors. Providing a direct link allow others to find your projects quickly and leave a little bloggy love as well.
Now that we have the details out of the way, here's some great creations from our Red, White, and Blue Color Challenge:

Alice from The Purple Loft Creations shared this adorable card over in the Blog Challenge Forum! Lovely design and that little couple is just precious!

Next, Michelle made this stunning tag for the challenge! Love her vintage take in creating with the red, white, and blue!

 Finally, Lois made this wonderful card! Beautiful punching and layering, topped off with that great star accent! Be sure to stop by Lois' blog to see this and other Independence Day inspired creations!
Thank all of you who participated in the challenge! It was great seeing all of your creations using the red, white, and blue! I hope all of you will come back and share in our "Anything Goes" challenge, and invite a friend! I look forward to coming back in a couple of weeks with a new challenge. Until then, take care and happy crafting!
I love this card Treva shared over in the challenge forum! Great paper selection, design, and I love those tiny stars!
Thank all of you who participated in the challenge! It was great seeing all of your creations using the red, white, and blue! I hope all of you will come back and share in our "Anything Goes" challenge, and invite a friend! I look forward to coming back in a couple of weeks with a new challenge. Until then, take care and happy crafting!
Friday, July 3, 2015
Have a Sparkly July 4th!

Today I am sharing an Independence Day easel card. They are super easy to make and look great displayed on a desktop.

Here are most of the supplies I used, including a free digital stamp from one of my favorite designers, Whimsie Doodles, Copic markers and glitter.

I cut the white cardstock into two pieces, a longer 4 1/4 inch by 11 inch and a 4 1/4 inch by 5 1/2 inch one. I scored the longer one at 5 1/2 and 2 3/4 inches.

Next, I colored and embellished my digi, layered it on top of patterned paper and then to adhered it to the shorter cardstock piece.

I took the longer cardstock piece, folded it in half and folded the smaller scored section down.

Next, I adhered the 4 1/4 x 5 1/2 inch base to the front of the easel card on the bottom half.

In order for the card to stay in the upright easel position, you need to place some type of dimensional embellishment on the bottom part of the card.

There are so many different styles of easel cards out there, can't wait to try another one! Do you have a favorite?
Thanks for stopping by!
Hugs,
Kimberly
Subscribe to:
Posts (Atom)
LinkWithin
