Showing posts with label Tena. Show all posts

Thursday, January 29, 2015

Lining My Pockets


A new year, a new approach!  If you’re like me, you’re always looking to try new things.  Especially products that will help me get more photos in my albums.  Now, I’m not looking to “catch up” or rush through my scrapbooking.  I enjoy the process of cutting paper and placing embellishments too much for that.  And would fun would it be to not have any photos to scrap?

But, at a scrapbooking retreat late last year, a fellow scrapbooker (our very own Tena!) was doing something I hadn’t seen before.  She was combining her normal 12x12 or 8x11 pages with the super-popular pocket pages.  I can scrap my normal pages, but have a ready way to get lots of full-size 4x6 photos included as well.  I love that!  

So, I’ve ordered some refill pages for a vacation album I’m working on.  Between my husband and myself, we took over 4,000 photos!  Now, I don’t plan to use them all, but you can see why I’m willing to give this approach a try – LOL!

In anticipation of my order of refill pages getting here, I’ve started to create some of the “fillers” I’ll use in the pockets.  I’ll have 3x4 and 2x4 pockets.  I created one for some photos of an Afternoon Tea we had on our cruise.  I even created one for some of the days when we had overcast weather.  


I can journal on the larger ones or simply use them as decorative parts of the pages.  How cool is that?  I love learning from my fellow scrapbookers!  Leave a comment and share something you’ve learned lately.

Happy Scrapping,
Moanica

Monday, June 16, 2014

Father's Day Card Collage

Hi everyone, I hope you all had a wonderful Father's Day. For my post this month I thought I would try something different for a layout. I wanted to create a page using old store bought cards I've been collecting over the years. The covers and sentiments were so sweet that I just couldn't throw them away.

I decided to use a few of my favorite cards that my daughter has given her daddy over the years for Father's Day. Since the original cards had different textures and sizes, I started by scanning them. After they were scanned, I re-sized them and cut them out.

Next I printed out the photos I wanted to use, I chose two photos for my page. One from 1988 and one we took this past weekend for a "then and now" look. I printed them out using wallet size so they wouldn't cover too much of the background. Now all I had to do was put my layout together, add a few embellishments and my title.


Dads & Daughters by Tena Ellison. Supplies - Patterned Paper: Glitz Design; Cork Alphas: Making Memories; Cork Arrows: American Crafts; Ink: Prima; Die Cut: Silhouette Cameo; Sequins: Teresa Collins; Metal Embellishment: Tim Holtz.
 
Now I have a few of my favorite cards and great memories on one page without having to use the original cards and there's no bulk.
 
How do you keep or your cards, whether they are store bought or handmade? Do you recycle them, scrap them or just throw them away? Leave a comment and let me know.
 
Happy crafting!
Tena


Friday, May 16, 2014

All you have to do is ask

I've always known that scrapbookers are some of the most generous people around...at least the group of ladies I've been scrapping and retreating with since 2006. That's how this project started. I wanted to play with my newest set of Faber-Castell Gelatos and a few other items at our last Sistah retreat earlier this month. So I asked Tiare if I could have a sheet of the water color paper she had been raving about, she said "sure, of course you can." I loved how easy it was to use the Gelatos on the water color paper and I had the perfect quote I wanted to use from the Silhouette store.

I thought the background looked great but that's where the easy part stopped for me. I decided to use a template with some molding paste, the girl image came out great but looked a little bland and needed something else. First I outlined the image but wasn't happy with that so I used a Prismacolor black marker to highlight the writing inside the image then I inked the image with some vintage photo distress ink to add some color to the molding paste. I also added some masking and stamping quotes to break up the negative space in the background.


Art by Tena Ellison. Supplies - Water color paper: (Tiare?); Templates: Crafter's Workshop, Tim Holtz; Molding Paste: Golden(HL); Gelatos: Faber-Castell; Distress Ink: Tim Holtz; Die Cut Quote: Silhouette Store; She Stamps: Unity Stamp; black cardstock for background.

This is my first large piece of mixed media, the size is 9.25x12.25. I've done some smaller art journaling pages but felt a little intimidated by this large size. It was great practice for when I decide to tackle my first large canvas. I don't think I'll be asking for anything else anytime soon but have to say I'm happy with how this turned out.

Be careful what you ask for...you just might get it LOL. But don't be afraid to try something new or push yourself outside of your comfort zone.

Happy Crafting!!

Tena

Wednesday, April 16, 2014

Creating with Julie Nutting Doll Stamps

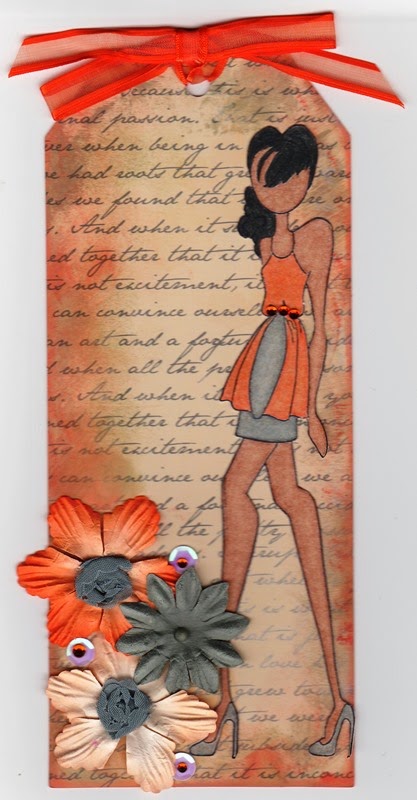
Okay, I'm not really an image stamper. Sure, I've made cards and I have stamped on many of my layouts but that was mainly using sentiment, words or phrases and maybe a flower or two...you know the easy stuff. So when I decided that I just had to have all the great new doll stamps I knew it would require me to do a little more than just stamping.

I knew I would have to get markers or colored pencils if I wanted to create something with a little more color to them. But I found out that I don't have a lot of patience for sitting and coloring for long periods plus I didn't know a thing about how to get just the right color shades for skin or hair. So when I saw a post on SOC about using Gamsol with color pencils I knew that would work for me.

Here are two tags I made using doll stamp "Taylor" and "Shay". For Shay I actually did the coloring with Prismacolor Pencils and Gamsol. For Taylor I stamped on patterned paper, cut out the pieces and layered them on top of another stamp of the same doll. I also did the skin tone and hair color using the color pencils and Gamsol technique.

Shay Doll Tag


Taylor Doll Tag


Doll Tags by Tena E. Supplies - Doll Stamps: Julie Nutting (Prima); Tags & Flowers: Prima; Patterned Paper: Kaisercraft; Sequins: Teresa Collins; Rose Trim: Maya Road; Colored Pencils: Prismacolor; Stamps: Little Yellow Bicycle; Distress Inks: Tim Holtz.
 
I still need more practice with coloring  and blending but like how they turned out for my first try.
 
What's your favorite way for coloring in your stamped images? Please leave a comment and let me know...Happy Crafting!
 
Tena

Sunday, March 16, 2014

Clear Scraps and Paint

It's March and the first day of spring is only a few days away according to the calendar. I know it still looks and feels like winter for a lot of you but here in Georgia it's starting to look and feel like spring time. We've been having some warmer temperatures and we're already seeing little buds opening up on trees. The pollen will follow soon enough.

So with that in mind, I wanted to share a layout I create using photos of my daughter with friends doing a little tree planting for spring. I also wanted to try doing my first layout using an acrylic sheet.

Tree planting by Tena E. Supplies - Acrylic Sheet: Clear Scraps;  Cardstock: Bazzill; Clear Stamps: Prima, My Mind's Eye; Title Letters; American Crafts Thickers, Cricut Cartridge (Tear Drop); Die Cuts: Silhouette Cameo; Ink: Colorbox; Template: Heidi Swapp; molding paste, acrylic paint.

I started out with a Clear Scraps Acrylic 12x12 sheet. I added some acrylic paint and a little molding paste using a template from Heidi Swapp. When the paint and molding paste was completely dry I finished completing the page as I normally would any other paper layout. I added some embellishments, stamping and my title.

My first attempt at creating with an acrylic background was easy and fun, I can't wait to try it again.

Note: to see through to the clear acrylic background, I scraped some of the blue acrylic paint off, this also gives it a little grungy look.

Remember March is National Craft Month...so happy crafting!

Tena

Sunday, February 16, 2014

Bag it & Tag it!

Hi everyone, I hope you're enjoying your Valentine's weekend. While I was organizing my new purchases from winter CHA and re-organizing some older products I came across a stash of small colorful bags. Somehow these little goodies have been overlooked...so I thought I would pull them out and create something. I paired them with tags from my stash or patterned paper I used to make tags also from my stash.


These little bags will make a great addition to any scrapbook layout for journaling, pocket page albums or you can use them as gift giving tags for any occasion. Just customize them with your favorite embellishments to fit your needs.

Bags & Tags by Tena Ellison. Supplies - Bags: Michaels (Party Supplies); Stamps: Teresa Collins, Stampabilities, Technique Tuesday; Embellishments: Teresa Collins, Recollections, Heidi Swapp, Jillibean Soup, My Mind's Eye, Prima; Ink: Ranger (Tim Holtz), Color Box.


Here's to all the forgotten treasures just waiting to be found.

Happy Crafting!

Tena

Thursday, January 16, 2014

New Year...New Products!

Happy New Year everyone! Can you believe that January is almost over? One of my favorite things about January is seeing all the new crafting products from winter CHA. I make a list of my "must have" items after looking at all the sneak peeks then wait patiently for them to start arriving in stores and online.

Today I want to share a layout I made with some "new to me" scrappy products. Technique Tuesday Steel Dies and Clear Stamps.

 And here is the layout I created:
 Snow Fun by Tena Ellison. Supplies - Patterned Paper: Fancy Pants (Timber Grove), Studio Calico (Sundrifter); Cardstock: Bazzill; Clear Stamps & Steel Dies: Technique Tuesday; Stickers: Fancy Pants; Die Cut Title: Silhouette Cameo; Enamel Dots: Prima (Sugardots); Ink: Colorbox.
 
I love how well the DIY Steel Dies work with the clear stamps. These would be great for all those Project Life, Smash Book albums and for card making. They also work well with traditional scrapbook pages and the clear stamps sentiments are perfect for all your photo moments.
 
Do you have any new products that you're looking forward to trying or buying? Do you have a list of your faves or must have like I do? If so, would love to hear what they are.
 
Happy Crafting!
 
Tena E.


Monday, December 16, 2013

Clothespins Snowflake Tutorial

If you're like me, you've already decorated your home for the holidays but today I'm sharing an easy ornament project that you can add at any time.


For this project you'll need eight (8) wooden clothespins, ribbon for hanging, a hot glue gun or your favorite wood glue, craft paint, mist or inks and a craft mat to protect your work surface.


First separate the clothespins by twisting off the metal spring.

After you have all the clothespins separated, glue them back together with the backsides touching.

Leave one pair of the clothespin un-glued, you will need this one for your ribbon. After the glued halves are dry you can add your paint, mist or inks to the clothespins.

When the paint is dry you can start to assemble your snowflake. Add a bead of glue to each of the tips, once you have four spokes connected, lay them flat on your craft mat to dry thoroughly before connecting the rest.


Once  all seven spokes are connected you're ready to create the hanger: Cut a three inch piece of ribbon then glue the tips together. Add a bead of glue to the last two halves of clothespin, before joining them together; insert the ribbon loop to create the hanger and press pieces together.

After the pieces are completely dry you can attach the hanger to the rest of the snowflake.

Now you have a wonderful snowflake ornament for your tree or other holiday decorations. This is a great craft project that the whole family can enjoy for years to come.

I can't believe another year has come to an end, I've had so much fun creating and sharing my projects and scrapbook pages with you all year. I hope you've all been inspired and will continue to be inspired by this blog...I know I am!

Merry Christmas and a Very Blessed New Year...from my family to all of yours!

~Tena E.


Saturday, November 16, 2013

The Trial and Error of my Burlap Wreath

I stared out with such excitement over this wreath and am very happy with the way it finally turned out. Although I did have a few bumps along the way. First I took to my favorite inspiration place Pinterest for a tutorial on making a burlap wreath and settled on this one: www.stonegableblog.com/2013/burlap-wreath tutorial. It seemed easy enough and didn't have as many steps as some others I've seen. After getting all my supplies together I was ready to get started.

Photo of my original supplies:
 
It was easier than I thought and was coming along pretty good...I decided that I wanted the entire wreath to be burlap and not use the mesh I had purchase. Well, wouldn't you know it, I ran out of burlap. I made a mad dash to Hobby Lobby to purchase more and there was none to be found, they even had it on sale for 50% off but all I found was 3 empty shelves and no burlap.
 
Photo of the half-finished wreath:


I then decided that I would check at Michaels the next day, luckily they had plenty of rolls but it cost $1.00 more (and not on sale) I did however use my 40% off coupon on one of the rolls. I purchased 2 rolls to be on the safe side but when I got back home it was not a match for the burlap I had already started with. So I had to un-do the old ribbon and start over with the new burlap...I was determined to get it done and up on my front door.

Photo of the finished wreath:
 
 
And here's the wreath hanging on my front door:


I really like how it turned out but don't think I'll take on any new projects for the up-coming holidays LOL.
 
I would love to hear about any new tutorials you've tried out lately or if you plan on trying one for future projects.
 
Have a wonderful & blessed Thanksgiving everyone!
 
~Tena

Wednesday, October 16, 2013

Mapping It!

Today I'm sharing a layout I created from our recent trip to St. Lucia. I wanted to use some sort of map patterned paper but the travel papers I had didn't work for what I had in mind, so I made my own using a map image from the internet and a St. Lucia cut file from my Silhouette.


ST. LUCIA By Tena Ellison. Supplies - Corrugated Paper: Fancy Pants;  Flower: Prima; Punch: Martha Stewart; Twine: Pink Paislee;
Button: My Mind's Eye; Title Letters: Silhouette and Cricut; Transparency: 3M.
 

First I copied the online map image into a MS Word document to resize before printing, after getting the size I wanted I printed it onto a transparency.

Next I cut out the Silhouette map image using the cut file. I cut the image slightly larger than the map on the transparency. I then layered the transparency map over the Silhouette image. The butterfly and arrows were cut using the same map image printed on while cardstock.

This was my first time trying this and I have to say I'm pleased with the results. This technique can be used for any travel page or card, just find a free image or use an old Atlas if you can't find that perfect patterned paper.

Happy Scrapping!
Tena

Sunday, September 15, 2013

National Indoor Plant Week

Who knew that there was such an event? Not me...but this one makes me happy. September 15-21 is National Indoor Plant Week. I'm a BIG indoor and outdoor plant lover and owner. I have several large indoor floor plants and a few small ones. I've actually scaled back in the last year; they do have a way of taking over.

Here's a layout I did using photos of plants in my home.

The Beauty of Plants by Tena Ellison. Supplies - Cardstock: Kraft; Pattern Paper & Sticker Alphas: Fancy Pants; Thickers: American Crafts; Distress Ink: Tim Holtz; Enamel Dots: Teresa Collins.

Indoor plants are great for our health and our interior design. They give us oxygen and we give them the carbon dioxide they desperately need. Plants are nature's natural purifiers and certain plants can absorb almost all volatile organic compounds in indoor air from most common chemicals like ammonia, formaldehyde and benzene. These chemicals are often emitted from products like carpets, printer ink, tobacco smoke and cleaning products.

I know that not all of us have a green thumb but plants have a remarkable way of surviving our mistakes, like to much watering or too little. The trick is to find the perfect plants for your home and family life.

So if you're like me with lots of plants in your home or if you're thinking of adding plants to your home or work office, remember to show them some extra love this week...you'll breathe a little easier too!

Thursday, August 15, 2013

Altered Chalkboard Easels

It's Back-to-School time! At least in my school district, school actually started here on August 7th. Whoa! Even I felt sorry for the kids and their short summer break LOL.

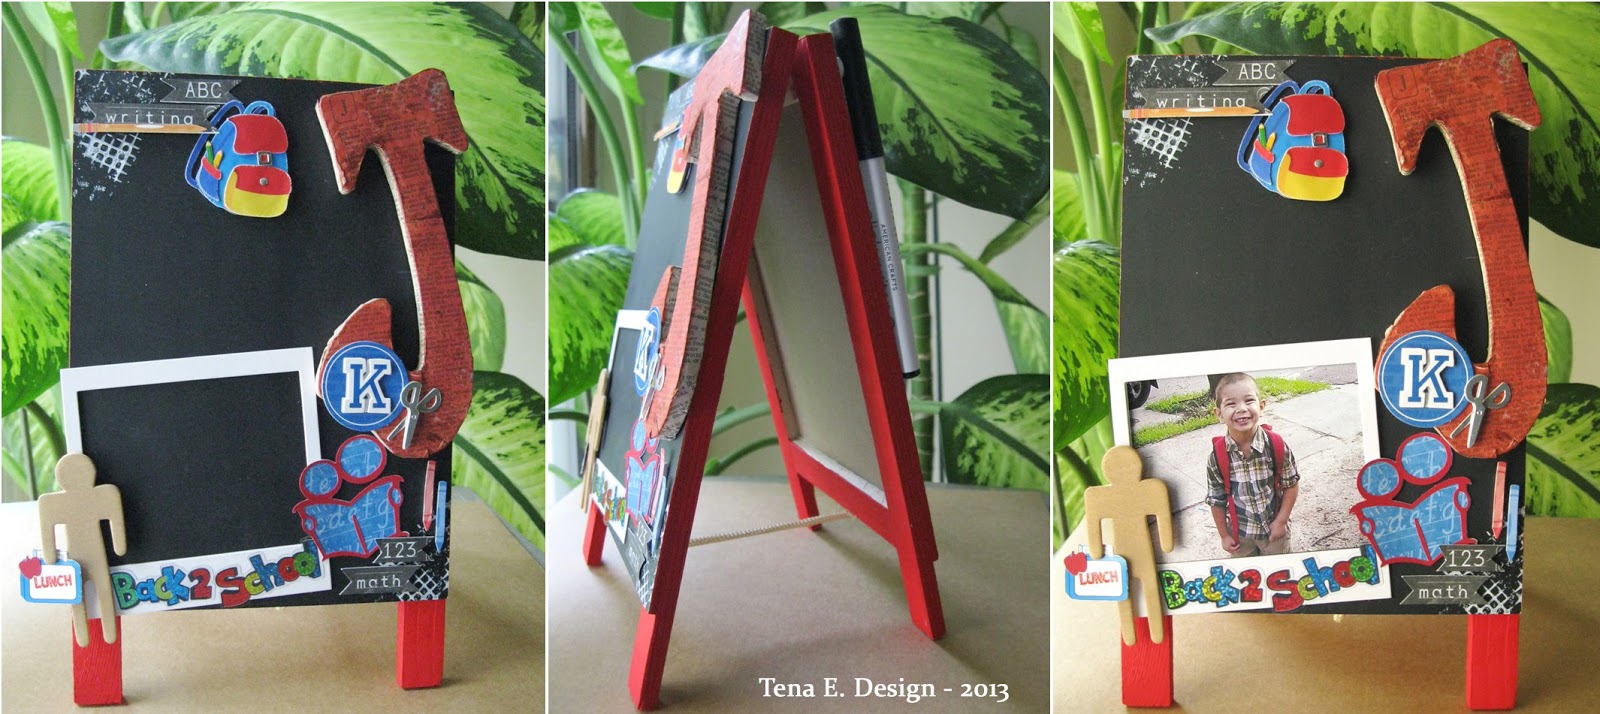
Although I no longer have a child in school or college, I do have a school age grandniece (Destiny) and nephew (Jayden), so I made these for them. I found these cute little easels at Hobby Lobby, along with the wooden initial letters and people shapes.


I painted the easels a bright red (nothing says back-to-school like the color red), then I added a little masking and stamping using some white distress stain to the chalkboard. After I covered the wood letters using pages from the D's and J's of an old dictionary, I inked the top of each letter with distress ink and adhered them to the easels. I also placed a polaroid frame for that "must have" first day of school photo. I finished by adding varies school embellishments to both of them.

The back side of the chalkboard is a dry eraser board; I just left it blank so that they can write or in Jayden's case draw their own thoughts about their first day at a new school.

Altered Easels by Tena Ellison.  Supplies - Easels, Wooden Letters & Shapes: Hobby Lobby, Patterned Paper:
Little Yellow Bicycle; Polaroid Frames: Recollections(Michaels); School Embellishments: Jolee's, Recollections, Cricut
and Graphically Speaking Cartridge; Distress Ink & Stain: Tim Holtz; Punch: EK Success; Stamp: Studio G; Acrylic paint,
misc ribbon.  

This was a fun project to make and I'm happy with the results. I would love to hear about some of your creative Back-to-school projects...and remember to take that important first day of school photo!

Happy creating!
Tena

Monday, July 15, 2013

Pinterest Inspired

As Aysha stated in her post on Saturday, "inspiration is all around us." A few days ago I was inspired while looking through quotes pins on Pinterest. I came across one that really made me smile. The quote read "I always buy another book when I still have ten to read." For me this is so true, I'd also just received a book as a birthday present from my daughter. It was a Walter Mosley novel, he's one of my all-time favorite authors. As you can tell from the photo in the layout, I still have three of his books on my summer "To Read" list.

After pinning this cute little quote, I decided that I would do a layout page of my summer reading list. I also searched for more reading quotes to go along with the first one for my layout.

Read by Tena Ellison. Supplies - Patterned Paper: Webster's Pages, Authentique; Title Letters: American Craft Thickers;
Ink: Colorbox; Twine: Doodlebug Design; Punch: EK Success; Clear Stamp: Recollections (Michaels);
Inspiration Quotes courtesy of Pinterest.

The quotes were not ready to be used "as is" for my page so I did a little editing using the Format Picture tool in MS Word. I changed the background colors, added a texture element and a shadow border to the inside of each one. I also re-sized them before printing and cutting them out. I think they turned out perfect for my page. Now all I have to do is start reading!

I hope you find time this summer for your favorite book or you can always just scrap about it, like me. LOL.

Saturday, June 15, 2013

Today is Smile Power Day!

Smiles are contagious, when you smile at another person they can't help smiling back...well most of the time anyway. Smiling adds years to your life, improves relationships, changes the mood for the giver and the receiver.

Smiling makes you a happier and healthier person. When you smile your brain releases a chemical called endorphin, once these chemicals are release they send more feel good messages to the rest of your body. Medically, it's also easier to smile than to frown because a smile uses fewer facial muscles.

I created the layout below because whenever I'm with these ladies, there's always plenty of smiles to go around.

All Smiles by Tena Ellison. Supplies - Patterned Paper: Authentique; Distress Stain: Tim Holtz;
Embossing Folder: Stampin' Up; Cuttlebug.
Many people don't realize just how powerful a smile can be; it can work magic by calming fears, insecurities, hurt feelings and emotional pain. You never know just how much it means to someone to see a bright smiling face.
 
So put on your sincerest smile and pass it on to everyone you see today!


Wednesday, May 15, 2013

Completing projects and using your stash

Hi everyone, I finally decided to try my hand at altering a photo tray. I bought this tray about three years ago while cropping with friends at Archiver's. It was still sitting in the bag I brought it home in.

I hope you all had a wonderful Mother's Day. It's a bittersweet day for me but I have a lot of memories of my mom that I want to share with my daughter. Since my mother passed before she was born documenting the memories I have of her is a great way for my daughter to know her too.

Sadly I don't have many photos of my mom so I really cherish the ones I do have. I used a couple of photos of my mom and a couple with me and my daughter when she was a little girl. The patterned paper is Authentique (Grace Collection), the embellishments are all odds and ends from my stash. I also used some molding paste, templates and distress ink in a couple of the tray squares. I really love the B&W photos with the papers and colors.


Mom Photo Tray by Tena Ellison. Supplies - Tray: 7Gypies; Patterned Paper: Authentique;
Flowers & Lace Trim: Prima; Brads: My Mind's Eye; Distress Ink: Ranger-Tim Holtz; Key: K & Company;
Template: Prima; Misc chipboard swirl, ribbon & hearts.
 
And in keeping with my pledge to use more of the scrap supplies I already have, this was a great project to do. So don't hoard those long un-used items...get busy and create!
 
What items have you been hoarding or projects you've been putting off?


Monday, April 15, 2013

Mixing and Matching

I must admit that it's very hard for me to resist buying patterned paper; it's one of my favorite scrappy supplies. And since I buy so much I tend to have plenty left over in my stash for future projects. I like mixing my newer paper purchases with older paper lines. I also like mixing different manufacturing lines. Today there are so many lines that have similar patterns and styles that it's easy to mix and match them to suit your taste.

On the layout below I used both old and new papers from Prima. The older one is from the Madeline collection and the newer one from the Lyric collection. They both worked well with my photos from our anniversary trip to the mountains. I also used some very old Heidi Swapp words for my title along with a mixture of embellishments from Basic Grey.

 
Always forever us by Tena E. Supplies - Patterned Paper: Prima; Title Words: Heidi Swapp;
Brad & Chipboard Embellishments: Basic Grey; Ink: Colorbox; Punch: EK Success.
 
Being a mixer is a great way to use your stash as well. So are you a one collection at a time scrapper or are you a mixer too? With so many great products available there's room for being both!
 
Happy Scrapping!
~Tena


Friday, March 15, 2013

A Very Special Thank You!

To all our sponsors for supporting the 1st Annual SOC Retreat. It was truly a wonderful event and a great experience being with so many talented paper crafters from all across the country. And to make this event even more special we received some great craft goodies from all our sponsors.

Today I'm sharing a layout I created using one of the page kits I received at the retreat from "Scrap Jammies". This page kit was prepared by Ginger Cooper and the contents were designed to create a double-page layout. I'm not big on making double layouts so I used part of the kit to make the layout below.

La Trattoria on the square by Tena Ellison. Supplies - Scrap Jammies August 2012 kit
by Ginger Cooper; Alphas: American Craft Thickers, Cosmo Cricket Tiny Type; Wooden Flourish:
Kaisercraft; Distress Inks: Tim Holtz; Mask Template: Prima; Punch: EK Success.
I'm looking forward to seeing more creations from the other attendees. There were some fantastic creative minds and hands in attendance. Hope we're able to keep this event going for years to come.
Thanks again to our wonderful sponsors!


Friday, February 15, 2013

Paper crafting with Kraft

Even though kraft cardstock has been around for a long time, it seems to be more popular than ever for paper crafts and scrapbooking. And why not? Just like black, cream or white cardstock, it's the perfect neutral. It looks great and gives your project a fresh, trendy feel.

There are more paper embellishments being made by manufacturing companies using kraft cardstock too such as tags, doilies, banners, journaling notes and flowers just to name a few. Kraft cardstock is great for inking, misting, acrylic paints or just to use as is. I know it has turned into one of my favorite "go to" neutrals for scrapbooking and cards.

Here's a layout I created using kraft cardstock, doily and tags.

 
Everyday Moments by Tena Ellison. Supplies - Kraft Cardstock: Hobby Lobby; Patterned Paper:
Bo Bunny Weekend Market; Kraft tags: Maya Road; Stamps: Little Yellow Bicycle; Ink: Colorbox;
Pearl Flourish: Prima; Flower Punch: EK Success; Cuttlebug & Embossing Folders.
 
So if you haven't used any kraft cardstock or other paper products, why not take another look, it's very versatile and inexpensive. And if you have, let us know. Happy crafting!

Tuesday, January 15, 2013

January is National Hobby Month!

A hobby is defined as an activity or interest pursued outside one's regular occupation, primarily for pleasure.

Most of us choose to start the New Year off with resolutions of better health, religious and financial goals. These are all great ways to start anew; we need a healthy body and spirit to go with a healthy mind, especially a creative  mind.

I created the layout below about one of my favorite hobbies, gardening. I love seeing the results of the plants, fruits and vegetables I've planted just as much as seeing a finished scrapbook page or altered art project.


Flowers feed the soul by Tena Ellison. Supplies - Cardstock: Bazzill Basic; Patterned Paper:
My Mind's Eye, Echo Park; Alphas: American Craft Thickers, Making Memories tiny 
sticker letters; Brads & Banners: My Mind's Eye, Echo Park.

So even if you already have several hobbies or if you're looking to start a new one, what better time to start than with the New Year?

What are some of your favorite hobbies? Remember a hobby should be fun, something that relaxes you and most of all bring you joy!

Saturday, December 15, 2012

Christmas Card Frame

If you're like me, you've already started receiving those wonderful Christmas cards from friends and family. Well this year since I did some re-decorating with my living room furniture and I'm minus a sofa table, I didn't have a place to display my holidays cards...so I decided to make a card frame. Here's how I did it:

Step 1 - I painted an unfinished wood frame from Hobby Lobby with white acrylic paint.

Step 1a - After the white paint was dry, I added some metallic gold paint over it.

Step 2 - Then I added some small cup hooks to the inside left and right of the frame.

Step 3 - After the cup hooks were added, I strung some gold cord by alternating to each side of the frame until all the hooks were filled. To make sure the cord stays tight, I used a staple gun to attach the ends of the cord to the back of the frame.

Here's how the finished frame looks without cards:

And here's the finished frame with a few cards added:
To attach the cards I used some clothes pins that I also painted with white and metallic gold paints. This was an easy project, I'm happy with how it tuned out and love that it can be used over and over for seasons to come.

I've really enjoyed sharing my creative projects and pages with everyone this year. Thanks so much to Tiare and all the wonderful, talented designers here at Scraps of Color Espire...Wishing you all a Merry Christmas and A Blessed New Year!

~Tena E.

LinkWithin

Related Posts Plugin for WordPress, Blogger...